Add
Transaction
Edit/Delete
Transaction
Cancel
Transaction
Add
Miscellaneous Income
Add
Miscellaneous Expense
Edit/Delete
Miscellaneous
Income
Edit/Delete
Miscellaneous
Expense
Add
Transaction
This
menu is used to add transactions. To add a transaction you have to include a
customer. In order to find out particular customer you have to enter
Customer ID or Customer Name. If you are giving Customer ID (eg: 1) for finding
out the customer, it will list all the customers whose ID starting with the
given ID (i.e., 1). If you are listing out customers using customer name, then
you have to give the first letter of the name. It will list all the customers
whose name starting with that character. This will display customer details in
the list. If you want to find out more details about the customer, you can click
on Find then the Find Customer window will appear.
In
order to display available services, either give Service ID, Service Name or
click on Display All Services. From available services select needed
services and add it in to Added Services by clicking Add button. Before
Adding the selected services into Added Services give the Quantity and Date of
Delivery. Then notice the status of transaction (Open, Close). While adding the
service into the added service, Gross, Net and Balance Amount will be
automatically generated. Also you can give Discount and can note if the customer
had paid any advance amount. Balance amount will be changed automatically
according to the advance given. If any discount has been given, then net amount
and balance will change automatically.
Also
you can remove an added service by clicking Remove button. Also you can
add function details if you have any order for function. You can enter
functional details by clicking Function Details button. After adding all
details you have to click on Add button to save the added transaction and
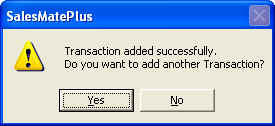
produce Receipt. When you click on Add button a message will be prompted as
shown in Fig 31 A. Click yes to add the amount into
customer balance. After that another message will come as shown in Fig
31 B
Add Transaction window is as shown in Fig
30. Transaction screen after a service has been added is as shown
in Fig 30 A. Functional Details screen is as shown
in Fig 31.The receipt is as shown in Fig
31 C.
Shortcut Key for Add
Transaction is Ctrl+T
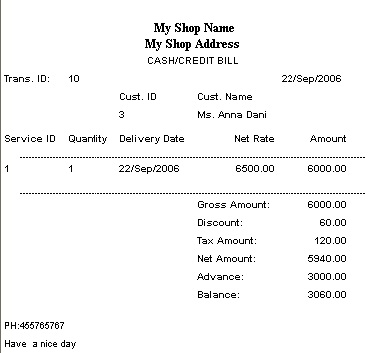
Fig30:
Add Transaction Details Screen before adding service
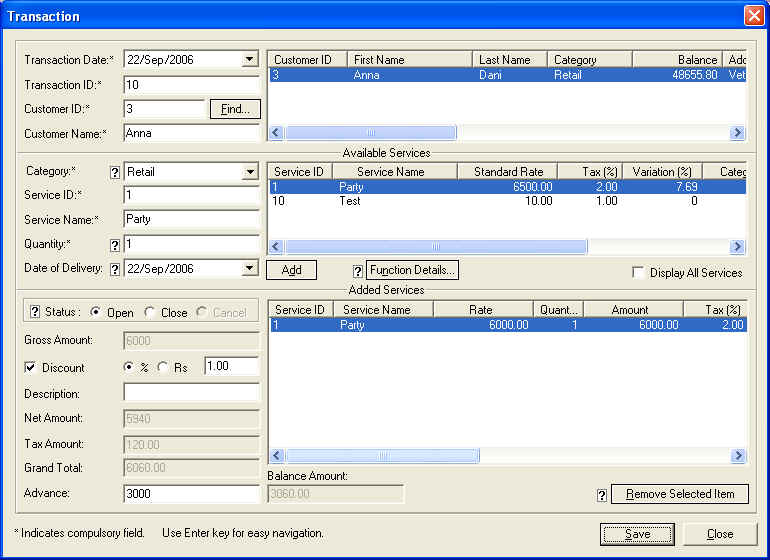
30 A: Add Transaction screen after adding a service
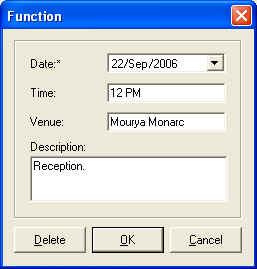
Fig
31: Functional Details Screen
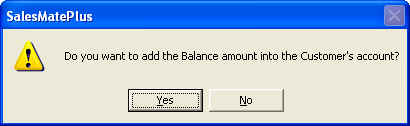
Fig
31 A:Add to customer Balance.
Fig
31 B: Add transaction.
Fig 31 C: Receipt of Transaction
Edit/delete
Transaction
In
this menu you can view, change or delete transaction. At first, Edit/delete
Transaction Window will appear. You can display Transaction details by
selecting various options such as Transaction ID, selecting List all transaction
/ transaction after a given date. After that, select needed services and click
on Edit button to Edit the transaction and Delete button to delete
the transaction.
Edit/Delete
Transaction window is as shown in Fig.32.
When
you click on Edit Button Transaction window will appear and you can make
necessary changes and save the changes. The changes will be updated to the
database and list in Edit/Delete Transaction. The Transaction Screen is
as shown in Fig 33. From there (Transaction Window)
also you can delete the transaction.
If
you click on Delete Button then it will display a message as shown in Fig
33 A, if the transaction is open. In the case of Closed/Cancelled
transaction another message will appear as shown in Fig 33B.
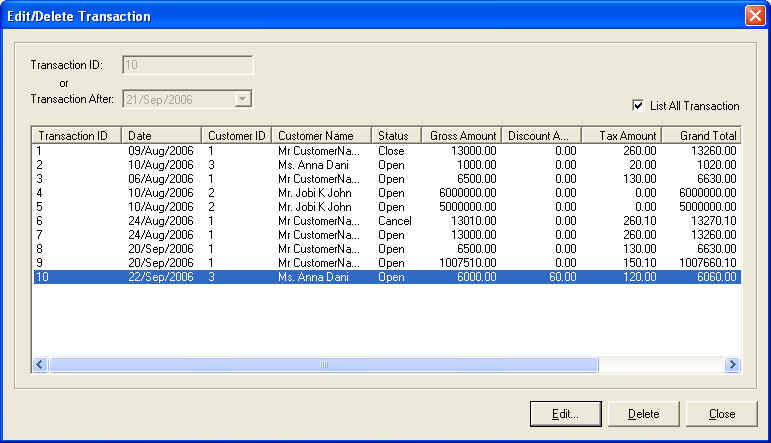
Fig32:
Edit Transaction Screen
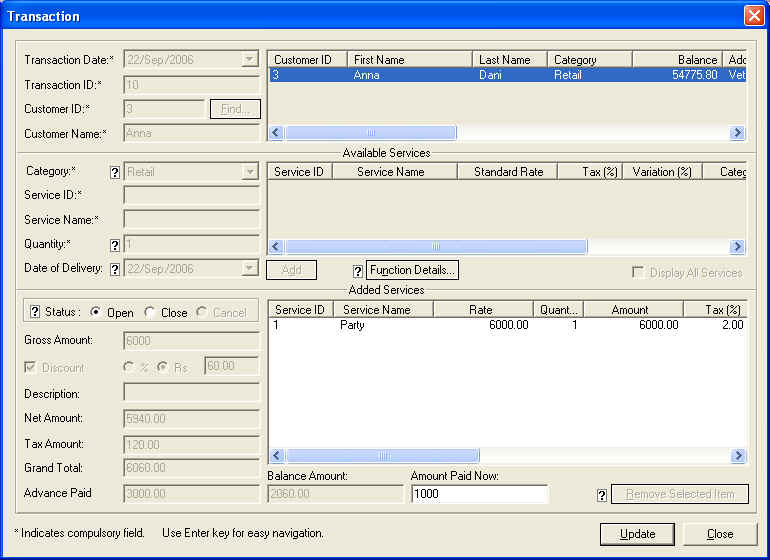
Fig
33: Transaction Screen
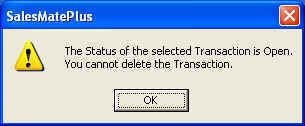
Fig
33 A: Message if transaction is open

Fig 33 B: Confirmation of deletion
Cancel
Transaction
In
this menu you can cancel a transaction. You can select the transaction by using
various options such as transaction ID, Transaction after a particular date or
List all Transaction. Then select the needed service from list and give Amount
returned to the customer. Amount returned to the customer will be enabled only
if the customer paid any advance. After entering amount returned, if any, click
on Save Button to cancel the transaction.
Cancel transaction window is as shown in Fig.34
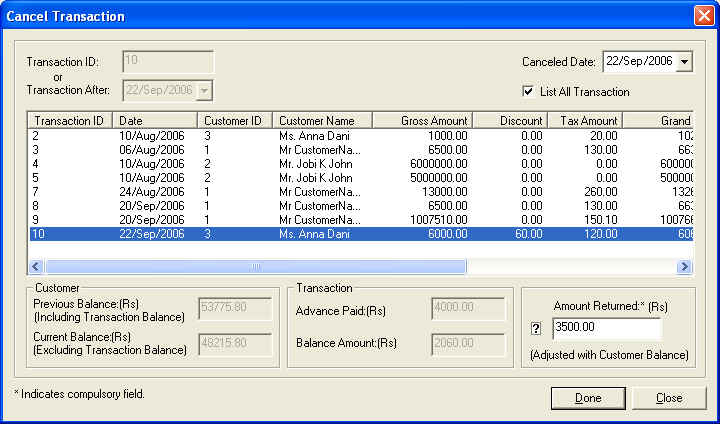
Fig.34:
Cancel Transaction
Add Miscellaneous
Income
In
this menu item you can add income which is not directly related to sales. You
can add Transaction Id, Date, Name, Amount and Description. You can select
Miscellaneous Item from ‘Transaction name’. If you want to add a new item
(misc. item), then Click on Add Button. When click on Add button,
Add Misc. Item Window will appear. After enter all the fields click on Save
button to save the
transaction into database as well as Transaction name.
Shortcut
key for Add Miscellaneous Income is Ctrl+I.
Add
Miscellaneous Income Screen is as shown in Fig 35
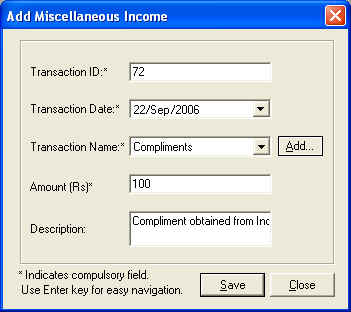
Fig
35: Add Misc. Income
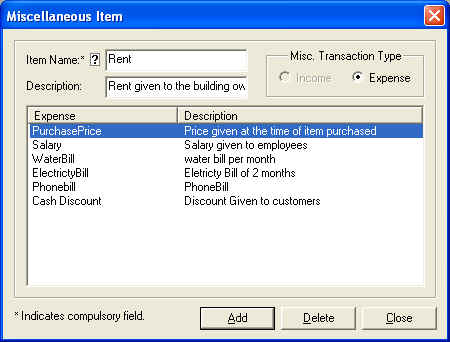
Add Miscellaneous
Item is as shown in Fig 36.
When this window is up, click on Add button and add new Item. After that
click on Save.
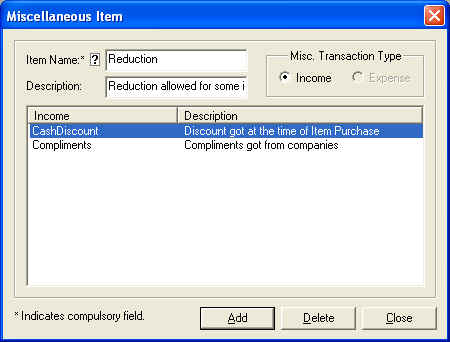
Fig
36: Add Miscellaneous Item Screen
Add Miscellaneous
Expense
In this
menu item you can add Expense which is not directly related to sales. For eg.
Expenses like employee salary, electricity bill etc. You can add Transaction Id,
Date, Name, Amount and Description. You can select miscellaneous expense from
Transaction name. If you want to add a new item (misc. item), then Click on Add
Button. When click on Add button, Add Misc. Item Window will appear.
After enter all the fields click on Save button.
Shortcut
Key for Add Miscellaneous Expense is Ctrl+E.
Add
Misc. Income Screen is as shown in Fig 37. Add Misc.
Item Screen is as shown in Fig 38. When this window
is up, click on Add button and add new Item.
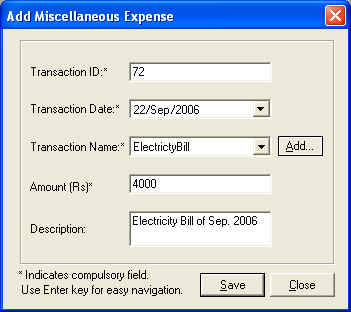
Fig
37: Add Miscellaneous Expense
Fig
38: Add Miscellaneous Item screen
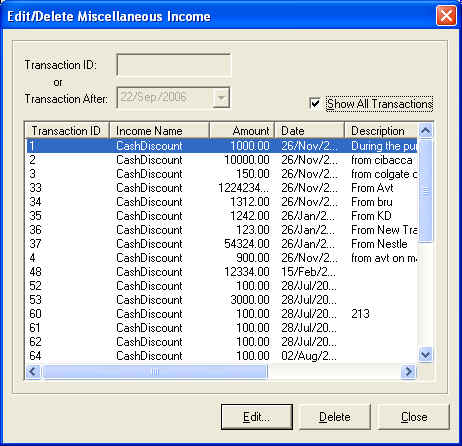
Edit/Delete
Miscellaneous
Income
In
this menu you can Edit/Delete Miscellaneous income. At first Edit Miscellaneous
Income window will appear. From here you can select Miscellaneous Income
Transaction. If you want to show all the transaction then select Show All
Transactions. Also you can select transaction using transaction ID and Date.
After
selecting a particular transaction click on Edit button to edit the
transaction or click on Delete button to delete Transaction. If you click
on Edit button then Edit Miscellaneous Income Screen will display. You
can make necessary changes and click on Save button to save the changes
to the database as well as list in edit Miscellaneous income.
If
you click on Delete button a message will appear as shown in Fig
40 A.
Edit Miscellaneous
Income is as shown in Fig 39.
Edit Income Screen for editing the details of the Transaction is as shown in Fig
40
Fig
39: Edit Income Screen
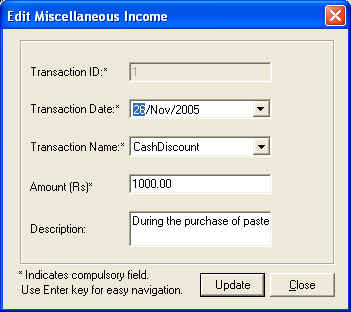
Fig
40: Edit Income Screen
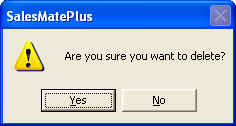
Fig
40 A: Confirmation of Deletion
Edit/Delete
Miscellaneous
Expense
In
this menu you can Edit/Delete Miscellaneous expense. At first, Edit
Miscellaneous Expense window will appear.From here you can select Miscellaneous
Transaction and if you want to see all the transactions then select Show
All Transactions. Also you can select transaction using transaction ID
and Date.
After
selecting a particular transaction click on Edit button to edit the
transaction or click on Delete button to delete Transaction. If you click
on Edit button then Edit Miscellaneous Expense Screen will display. You
can make necessary changes and click on Save button to save the changes
to the database as well as list in edit Miscellaneous expense.
If
you click on Delete button a message will appear as shown in Fig
42 A.
Edit Miscellaneous
Expense is as shown in Fig 41.
Edit Expense Screen for editing the details of the Transaction is as shown in Fig
42.
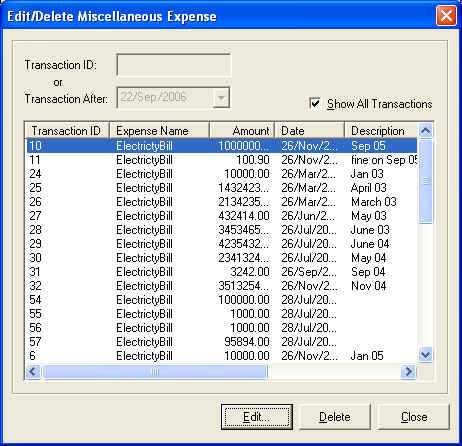
Fig.41:
Edit Expense for searching Miscellaneous Transaction
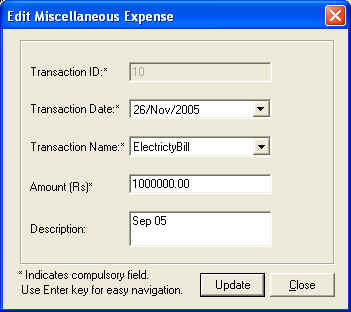
Fig.42:
Edit Expense Screen for editing the Details

Fig
42 A: Confirmation of Deletion